
Tuesday, December 19, 2017
Let Fly Mixed Media Art Journal Page
OK, I think this may be one of my favourites. And...I liked it so much I recreated it on a canvas! It's not identical to the art journal version of course, but I still really like them both.


Thursday, December 14, 2017
Art Journal Page Swap with Laura Marek
Hello everyone! I had been having some trouble with confidence and mojo for a while. I happened to post a query to one of my favorite mixed media Facebook Groups (Maremi's Creative Cafe), asking what other people did to find their mojo again, and along with some wonderful comments of encouragement, a lady offered to do an art journal page swap with me. Her name is Laura Marek, and she creates wonderful art journal pages with acrylic paints and gelli prints, as well as magazine cut outs and other embellishments.

So Laura and I agreed to do a swap with two art journal pages, in the size of our choice. I decided to do my pages on 8 x 10 mixed media paper that I already had cut and ready to create on.
|

For this first art journal page, I took my inspiration from the two colors I decided to work with. I wanted to use this Phthalo Turquoise Fluid Acrylic paint from Tri Art and Craft Smart's Cafe au Lait.
|

I added embellishments and a word tile from Tim Holtz. I love how this turned out, and Laura is a big part in getting my mojo back, thank you Laura!
|

My second art journal page started out with one of my favorite techniques using acrylic paint, glazing medium and plastic wrap.
|

I drew out sections of the page, traced some circles and glazed them with different colors, then I shaded and highlighted the different parts.
|

The text is stamped onto tissue paper and glued down with Matte Gel Medium, and lastly I added some paint splatters and a clock stamp from Tim Holtz. I would like to say, the people I have come across in the Maremi Creative Cafe Facebook group are so caring and special. To give a total stranger the courage and confidence to continue with a new form of art takes a great kind of people. Thank you to all of you, and a special thanks to Laura Marek, for going above and beyond to help me with my journey with its ups and downs.
|
  |
Tuesday, December 12, 2017
Be Real Mixed Media Art Journal Page
I sure hope everyone is staying warm out there! We just got hit with a big winter storm here in North Western Ontario! I have another art journal page to share with you today. This one is called Be Real.


Tuesday, December 5, 2017
A Glimpse of Heaven Art Journal Page
Hello everyone, things have been so busy lately, that I have been neglecting my blog! I definitely have to remedy that situation in a hurry! I have a few art journal pages to blog about so I'll start with this one :) I call it A glimpse of Heaven (no surprise given the sentiment that's on it lol).


Tuesday, November 28, 2017
Gelli Plate Planner Dividers for OOAK Artisan Showcase
Hello everyone! Remember those Gelli prints I showed you a few weeks back? Well...I have a project to show you today, for OOAK Artisan Showcase, that uses those fun prints and turns them into something many of us use every day.
 |
Tuesday, October 24, 2017
Shine Art Journal Page with OOAK Artisan Showcase
I have an art journal page to share with you today for OOAK Artisan Showcase in one of my newly made art journals. I created the art journal with bristol paper cut to 4 x 6 and bound it with my Bind-It-All and some heavy weight board for the covers.

I started by putting down these star die cuts that I had. There were many different sizes and colors. I knew I was going to cover them over, so my main focus was placement. I glued them with Uhu glue stick.

I covered it with a few coats of gesso but tried to keep the layers thin so that I didn't lose the outlines of the stars.

I decided to use some Silks Acrylic Glazes in a few of my favorite colors.

I painted the glazes on in several layers. First putting them on in a mottled pattern, letting them sit for a minute and then wiping them back with a wet wipe. Each layer builds up the color and makes it brighter.

I also concentrated wiping the color off the raised areas of the individual stars to create a contrast and to bring the stars to the foreground.

The last layer was a thin layer of black, to fill in the crooks and crannies, and then some black splatters (because what's an art journal page without splatters!). And of course wiping it back and off the raised parts of the stars to keep their shapes.

I finished of the page by adding a focal point using tin foil, silver mesh ribbon, some black thread and patterned paper. Lastly, I added a word sticker from Tim Holtz that says "Shine like the whole universe is yours".

I will be posting about every page in this journal and I hope to have more pages completed soon. I really enjoyed the size of this journal and I love the vertical orientation! My goal is to have the whole book completed, front and back of the pages as well as the cover, in order to be able to display it on a stand. Then every day or month or whenever you feel like it, you can just flip the page and display a new one :) A whole display of little pieces of art :)
Thank you for stopping by, see you soon!

I started by putting down these star die cuts that I had. There were many different sizes and colors. I knew I was going to cover them over, so my main focus was placement. I glued them with Uhu glue stick.

I covered it with a few coats of gesso but tried to keep the layers thin so that I didn't lose the outlines of the stars.

I decided to use some Silks Acrylic Glazes in a few of my favorite colors.

I painted the glazes on in several layers. First putting them on in a mottled pattern, letting them sit for a minute and then wiping them back with a wet wipe. Each layer builds up the color and makes it brighter.

I also concentrated wiping the color off the raised areas of the individual stars to create a contrast and to bring the stars to the foreground.

The last layer was a thin layer of black, to fill in the crooks and crannies, and then some black splatters (because what's an art journal page without splatters!). And of course wiping it back and off the raised parts of the stars to keep their shapes.

I finished of the page by adding a focal point using tin foil, silver mesh ribbon, some black thread and patterned paper. Lastly, I added a word sticker from Tim Holtz that says "Shine like the whole universe is yours".

I will be posting about every page in this journal and I hope to have more pages completed soon. I really enjoyed the size of this journal and I love the vertical orientation! My goal is to have the whole book completed, front and back of the pages as well as the cover, in order to be able to display it on a stand. Then every day or month or whenever you feel like it, you can just flip the page and display a new one :) A whole display of little pieces of art :)
Thank you for stopping by, see you soon!
Friday, September 22, 2017
Gelli Plate Mono Printing
Hello everyone! I am back from my much needed holidays, and have some fun creations for you for OOAK Artisan Showcase.

To celebrate being home, I have created some fun things for you for the next few blog posts...I know, like they're not ALL fun hahahaha.

To start off, this month I am playing with the Gelli Arts Gelli Plate. Oh what fun! I made a home made one a few years ago, and really, it didn't measure up to an actual one. The real Gelli Plate is just so smooth and creates beautifully.

I have quite a few pictures in this post, there's really no other way to show you how great the Gelli Plate is!

To start off this project,I re-learned how to use the Gelli Plate. I created pages and pages of prints just for fun.
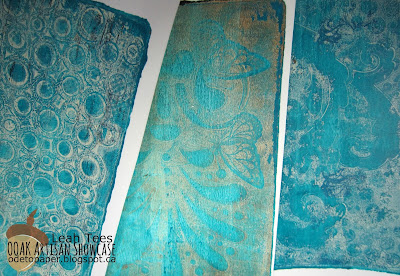
Then I watched more Youtube videos and learned a few more complicated tricks and techniques, like ghosting.

I used acrylic paint, stencils, rubber stamps and a few different catalysts to create a whole bunch of prints that I will be using in an upcoming project.

You may even recognize some of these prints!
So I will see you next time with a fun project to make with these great Gelli Plate prints and a couple of other new tools that I just won't be able to live without! See you soon! ~ Leah
You can more of Leah's art online!
Blog: odetopaper.blogspot.ca
Facebook: https://www.facebook.com/odetopaper/
Instagram: https://www.instagram.com/ode_to_paper/?hl=en
Pinterest: https://www.pinterest.com/ltees/

To celebrate being home, I have created some fun things for you for the next few blog posts...I know, like they're not ALL fun hahahaha.

To start off, this month I am playing with the Gelli Arts Gelli Plate. Oh what fun! I made a home made one a few years ago, and really, it didn't measure up to an actual one. The real Gelli Plate is just so smooth and creates beautifully.

I have quite a few pictures in this post, there's really no other way to show you how great the Gelli Plate is!

To start off this project,I re-learned how to use the Gelli Plate. I created pages and pages of prints just for fun.

Then I watched more Youtube videos and learned a few more complicated tricks and techniques, like ghosting.

I used acrylic paint, stencils, rubber stamps and a few different catalysts to create a whole bunch of prints that I will be using in an upcoming project.

You may even recognize some of these prints!
So I will see you next time with a fun project to make with these great Gelli Plate prints and a couple of other new tools that I just won't be able to live without! See you soon! ~ Leah
You can more of Leah's art online!
Blog: odetopaper.blogspot.ca
Facebook: https://www.facebook.com/odetopaper/
Instagram: https://www.instagram.com/ode_to_paper/?hl=en
Pinterest: https://www.pinterest.com/ltees/
Subscribe to:
Posts (Atom)