| Hello all, it's getting pretty chilly up here in the great white north, and I can't help but sit and create when it's this cold! Who wants to be outside in this weather? Not me! |
 |
Showing posts with label OOAK ARTISAN SHOWCASE. Show all posts
Showing posts with label OOAK ARTISAN SHOWCASE. Show all posts
Tuesday, January 23, 2018
Salvaged Mixed Media Art Journal Page with OOAK Artisan Showcase

Tuesday, December 26, 2017
Mixed Media Art Journal Page for OOAK Artisans Showcase
I am using a Cloth, Paper, Scissors magazine edition for my inspiration today for OOAK Artisan Showcase. In every edition they post a reader's challenge, and in May of 2017, the challenge was flowers!
 |
Tuesday, November 28, 2017
Gelli Plate Planner Dividers for OOAK Artisan Showcase
Hello everyone! Remember those Gelli prints I showed you a few weeks back? Well...I have a project to show you today, for OOAK Artisan Showcase, that uses those fun prints and turns them into something many of us use every day.
 |
Tuesday, October 24, 2017
Shine Art Journal Page with OOAK Artisan Showcase
I have an art journal page to share with you today for OOAK Artisan Showcase in one of my newly made art journals. I created the art journal with bristol paper cut to 4 x 6 and bound it with my Bind-It-All and some heavy weight board for the covers.

I started by putting down these star die cuts that I had. There were many different sizes and colors. I knew I was going to cover them over, so my main focus was placement. I glued them with Uhu glue stick.

I covered it with a few coats of gesso but tried to keep the layers thin so that I didn't lose the outlines of the stars.

I decided to use some Silks Acrylic Glazes in a few of my favorite colors.

I painted the glazes on in several layers. First putting them on in a mottled pattern, letting them sit for a minute and then wiping them back with a wet wipe. Each layer builds up the color and makes it brighter.

I also concentrated wiping the color off the raised areas of the individual stars to create a contrast and to bring the stars to the foreground.

The last layer was a thin layer of black, to fill in the crooks and crannies, and then some black splatters (because what's an art journal page without splatters!). And of course wiping it back and off the raised parts of the stars to keep their shapes.

I finished of the page by adding a focal point using tin foil, silver mesh ribbon, some black thread and patterned paper. Lastly, I added a word sticker from Tim Holtz that says "Shine like the whole universe is yours".

I will be posting about every page in this journal and I hope to have more pages completed soon. I really enjoyed the size of this journal and I love the vertical orientation! My goal is to have the whole book completed, front and back of the pages as well as the cover, in order to be able to display it on a stand. Then every day or month or whenever you feel like it, you can just flip the page and display a new one :) A whole display of little pieces of art :)
Thank you for stopping by, see you soon!

I started by putting down these star die cuts that I had. There were many different sizes and colors. I knew I was going to cover them over, so my main focus was placement. I glued them with Uhu glue stick.

I covered it with a few coats of gesso but tried to keep the layers thin so that I didn't lose the outlines of the stars.

I decided to use some Silks Acrylic Glazes in a few of my favorite colors.

I painted the glazes on in several layers. First putting them on in a mottled pattern, letting them sit for a minute and then wiping them back with a wet wipe. Each layer builds up the color and makes it brighter.

I also concentrated wiping the color off the raised areas of the individual stars to create a contrast and to bring the stars to the foreground.

The last layer was a thin layer of black, to fill in the crooks and crannies, and then some black splatters (because what's an art journal page without splatters!). And of course wiping it back and off the raised parts of the stars to keep their shapes.

I finished of the page by adding a focal point using tin foil, silver mesh ribbon, some black thread and patterned paper. Lastly, I added a word sticker from Tim Holtz that says "Shine like the whole universe is yours".

I will be posting about every page in this journal and I hope to have more pages completed soon. I really enjoyed the size of this journal and I love the vertical orientation! My goal is to have the whole book completed, front and back of the pages as well as the cover, in order to be able to display it on a stand. Then every day or month or whenever you feel like it, you can just flip the page and display a new one :) A whole display of little pieces of art :)
Thank you for stopping by, see you soon!
Friday, September 22, 2017
Gelli Plate Mono Printing
Hello everyone! I am back from my much needed holidays, and have some fun creations for you for OOAK Artisan Showcase.

To celebrate being home, I have created some fun things for you for the next few blog posts...I know, like they're not ALL fun hahahaha.

To start off, this month I am playing with the Gelli Arts Gelli Plate. Oh what fun! I made a home made one a few years ago, and really, it didn't measure up to an actual one. The real Gelli Plate is just so smooth and creates beautifully.

I have quite a few pictures in this post, there's really no other way to show you how great the Gelli Plate is!

To start off this project,I re-learned how to use the Gelli Plate. I created pages and pages of prints just for fun.
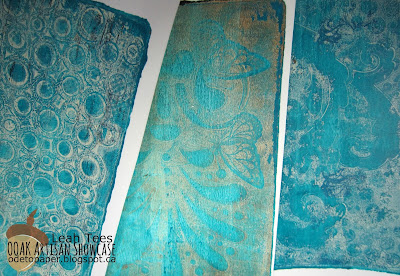
Then I watched more Youtube videos and learned a few more complicated tricks and techniques, like ghosting.

I used acrylic paint, stencils, rubber stamps and a few different catalysts to create a whole bunch of prints that I will be using in an upcoming project.

You may even recognize some of these prints!
So I will see you next time with a fun project to make with these great Gelli Plate prints and a couple of other new tools that I just won't be able to live without! See you soon! ~ Leah
You can more of Leah's art online!
Blog: odetopaper.blogspot.ca
Facebook: https://www.facebook.com/odetopaper/
Instagram: https://www.instagram.com/ode_to_paper/?hl=en
Pinterest: https://www.pinterest.com/ltees/

To celebrate being home, I have created some fun things for you for the next few blog posts...I know, like they're not ALL fun hahahaha.

To start off, this month I am playing with the Gelli Arts Gelli Plate. Oh what fun! I made a home made one a few years ago, and really, it didn't measure up to an actual one. The real Gelli Plate is just so smooth and creates beautifully.

I have quite a few pictures in this post, there's really no other way to show you how great the Gelli Plate is!

To start off this project,I re-learned how to use the Gelli Plate. I created pages and pages of prints just for fun.

Then I watched more Youtube videos and learned a few more complicated tricks and techniques, like ghosting.

I used acrylic paint, stencils, rubber stamps and a few different catalysts to create a whole bunch of prints that I will be using in an upcoming project.

You may even recognize some of these prints!
So I will see you next time with a fun project to make with these great Gelli Plate prints and a couple of other new tools that I just won't be able to live without! See you soon! ~ Leah
You can more of Leah's art online!
Blog: odetopaper.blogspot.ca
Facebook: https://www.facebook.com/odetopaper/
Instagram: https://www.instagram.com/ode_to_paper/?hl=en
Pinterest: https://www.pinterest.com/ltees/
Tuesday, August 22, 2017
Write Your Story Art Journal Spread for OOAK Artisan Showcase
Hello everyone, I have an art journal spread to share with you today for OOAK Artisan Showcase :)
I think this is my very favorite one so far!

I love how vibrant the blue and teal colors turned out. I created the background with acrylic paints and medical and sports tape lol. And what fun it was!

I also used some home made texture paste and stencils and stamps on tissue paper.

If you would like to see more details about this project, please visit the OOAK Artisan Showcase blog :)

I also promised to take more process photos and videos of my work, so please, hold me to that!
See you very soon!
Friday, July 21, 2017
Mixed Media Page Every Great Dreamer
Hello everyone! It's my turn to share a project for the OOAK Artisan Showcase blog! I have created a mixed media page today using inspiration from Jenn Engle, AKA Mixed Media Jenn and Deedee Catron.

I created this page using the over spray sheet I was using for another project lol. The orange is a Tim Holtz Distress Spray in Carved Pumpkin and the pink is Dylusions Cherry Pie. I added some texture with drywall mesh, stencils and gesso. I also painted some bubble wrap and used it as a stamp lol.

I also added some masking tape (thanks Deedee, now I'm addicted to masking tape) and grunged it up with a charcoal pencil, then I activated the charcoal with water. The larger piece in the back is a piece of paper drywall tape.

This stamp is from Dina Wakely, and I colored her using my Portfolio Water-Soluble Pastels and blending them with just my finger. I stuck some burlap, some die cuts from Tim Holtz that I have painted black and black twine behind her after I splattered the piece with watered down gesso. The sentiment is one I found while grazing around the internet.
I really enjoyed creating this project, and I know you will be seeing more mixed media projects from me real soon! Thanks for stopping by, and I hope to see you soon!
Friday, June 23, 2017
Watercolor Bookmarks with OOAK Artisan Showcase!
Hello everyone, I have two water colored bookmarks to share with you today for OOAK Artisan Showcase! These bookmarks feature stamps from Whipper Snapper Designs, Inc.

I created these bookmarks on Prima Water color paper that comes in a 3 x 625 inch pad. This is a great size for bookmarks. My daughter, who is an avid reader, says the wider bookmarks are better than the longer, skinnier ones because they stick out from the book farther and get bent! I didn't even think of that, what a happy accident :)

I painted these cute images using my Prima water color pencils, and used my Winsor & Newton Cotman water colors to do the skies.

These little mice are so cute, the pair of grey mice are called Yin & Yang.

And this little brown mouse is called Daisy.
If you have come from the OOAK Artisan Showcase blog, you know that I promised that I had an idea lol. My thought is this...I have a whole pad of this bookmark size watercolor paper and I have only used four sheets so far. IF you are an avid reader, and IF you would like to have one of my bookmarks...I will work on completing the entire pad of bookmarks.
Every time you see a new bookmark on my blog you can comment and let me know that you would like to have one :) If there are more than one of you I will use Random.org to decide and then I'll contact you for your address and send it to you! Do you like that idea?
This will be open worldwide, so don't be shy!
Thank you for visiting my blog today and I hope to see you again soon :) And, btw, there is one of these bookmarks available for someone who would like to have it! So leave me a comment and let me know you would love it and I'll send it out to someone soon!

Tuesday, May 2, 2017
A Little Mixed Media (SAY WHAT?!)
Hahaha yes, I am playing with mixed media!
I am also working with a new company out of New York State called OOAK Artisan Showcase. It's a great company that wants to promote and encourage artists all over the world. The owner of the company is Shelley Graham Turner, and I have known Shelley online for quite a few years, way back to when we were both creating jewelry:)
So, for my first project post for OOAK, I have created a mixed media project, aptly named "Dreams and Dedication". I used a fabulous quote in my piece that speaks to my heart.

This project started out as a 6x6 piece of watercolor paper from the Prima Marketing Paintables pad. I watercolored it with Distress Crayons and then it sat on my desk for a few months. I just didn't know what to do with it, lol. Finally I sat down with it one night and just decided to play around.
I added some stencils and molding paste, then I added some acrylic paint, and black gesso. I looked for a quote and found this one that I loved, so I printed it out and added it to the paper. I got out my magic marker and started adding lines.
Then I decided it was way too small, and found a wooden artist board (from the dollar store!) and painted it with black gesso. I added the paper to it and decided it needed even more color (go figure!). I mixed some distress crayon with white acrylic paint and had a little finger painting fun. Then I added flowers that I distressed with the black gesso, some cardboard embellishments that I heat embossed and some metal embellishments. Lastly, I decided it needed something special and I dug out my bronze acrylic paint and my fingers went to work again!
I am excited about this piece, and it has given me inspiration for other pieces which I hope to show you soon!
Thank you for visiting, and I hope ou will also visit the OOAK Artisan Showcase blog for more inspiration every week! We will also be featuring OOAK members, so if you would like to be a member, please go to ooakartisanshowcase.com and join us!
I am also working with a new company out of New York State called OOAK Artisan Showcase. It's a great company that wants to promote and encourage artists all over the world. The owner of the company is Shelley Graham Turner, and I have known Shelley online for quite a few years, way back to when we were both creating jewelry:)
So, for my first project post for OOAK, I have created a mixed media project, aptly named "Dreams and Dedication". I used a fabulous quote in my piece that speaks to my heart.

This project started out as a 6x6 piece of watercolor paper from the Prima Marketing Paintables pad. I watercolored it with Distress Crayons and then it sat on my desk for a few months. I just didn't know what to do with it, lol. Finally I sat down with it one night and just decided to play around.
I added some stencils and molding paste, then I added some acrylic paint, and black gesso. I looked for a quote and found this one that I loved, so I printed it out and added it to the paper. I got out my magic marker and started adding lines.
Then I decided it was way too small, and found a wooden artist board (from the dollar store!) and painted it with black gesso. I added the paper to it and decided it needed even more color (go figure!). I mixed some distress crayon with white acrylic paint and had a little finger painting fun. Then I added flowers that I distressed with the black gesso, some cardboard embellishments that I heat embossed and some metal embellishments. Lastly, I decided it needed something special and I dug out my bronze acrylic paint and my fingers went to work again!
I am excited about this piece, and it has given me inspiration for other pieces which I hope to show you soon!
Thank you for visiting, and I hope ou will also visit the OOAK Artisan Showcase blog for more inspiration every week! We will also be featuring OOAK members, so if you would like to be a member, please go to ooakartisanshowcase.com and join us!
Subscribe to:
Posts (Atom)